spring是目前java三大框架里面最流行的框架,spring的意思是春天,意味着java程序员的春天到来了,通过spring的IOC思想,我们在再也不需要去new一个对象啦(捂脸),作为一个容器框架,不管是domian对象还是数据流还是service对象,我们已知的任何java对象几乎都可以注入到spring里面。
案例
使用spring2.5.5开发的
1、引入spring开发包,最小配置是spring.jar和日志包(common-logging.jar)
2、创建service对象
1
2
3
4
5
6
7
8
9
10
11
12
13
14
15
16
17
18
19
20
| package com.service;
public class UserService {
private String name;
public String getName() {
return name;
}
public void setName(String name) {
this.name = name;
}
public void sayHello(){
System.out.println("hello" +name);
}
}
|
2、创建spring核心文件(applicationContext.xml),该文件一般放在src目录下
1
2
3
4
5
6
7
8
9
10
11
12
13
14
15
16
17
18
19
| <?xml version="1.0" encoding="UTF-8"?>
<beans xmlns="http://www.springframework.org/schema/beans"
xmlns:xsi="http://www.w3.org/2001/XMLSchema-instance"
xmlns:context="http://www.springframework.org/schema/context"
xmlns:tx="http://www.springframework.org/schema/tx"
xsi:schemaLocation="http://www.springframework.org/schema/beans http://www.springframework.org/schema/beans/spring-beans-2.5.xsd
http://www.springframework.org/schema/context http://www.springframework.org/schema/context/spring-context-2.5.xsd
http://www.springframework.org/schema/tx http://www.springframework.org/schema/tx/spring-tx-2.5.xsd">
<bean id="userService" class="com.service.UserService">
<property name="name">
<value>明阳</value>
</property>
</bean>
</beans>
|
注意spring在2.0之前的版本使用的是dtd声明,之后使用schema声明,然后spring里面的bean可以代表任何java对象
3、调用
1
2
3
4
5
6
7
8
9
10
11
12
13
14
| import org.springframework.context.ApplicationContext;
import org.springframework.context.support.ClassPathXmlApplicationContext;
import com.service.UserService;
public class Test {
public static void main(String[] args) {
ApplicationContext ac = new ClassPathXmlApplicationContext("applicationContext.xml");
UserService us = (UserService) ac.getBean("userService");
us.sayHello();
}
}
|
spring处理类与类之间的关系,例如UserService里面还有一个属性对象ByService就这样写
1
2
3
4
5
6
7
8
9
10
| <bean id="userService" class="com.service.UserService">
<property name="name">
<value>明阳</value>
</property>
<property name="byService" ref="byService" />
</bean>
<bean id="byService" class="com.service.ByService">
<property name="name" value="张三" />
</bean>
|
注意这个name很重要,例如name为byService,spring在反射的时候就用这个ByService作为get和set的方法名
当程序执行到
1
| ApplicationContext ac = new ClassPathXmlApplicationContext("applicationContext.xml");
|
的时候会去加载applicationContext.xml文件,然后通过反射机制new出了bean对象,并且放到内存中去,spring实际上是一个容器框架,可以配置各种bean并且可以维护bean与bean之间的关系,当我们需要使用某个bean的时候,我们可以直接getbean(id)即可。
IOC
ioc全称是inverse of control,翻译成中文就是控制反转,所谓控制反转就是把创建对象和维护对象的关系的权利从程序中转移到spring容器文件applicationContext.xml中,程序本身不再维护
DI
DI全称是dependency in_jection,翻译成中文就是依赖注入,实际上DI和IOC是同一个概念,spring的设计者认为DI更能表示SPring的核心
另外ApplicationContext是一个重量级的类,我们要使用单例模式来创建
1
2
3
4
5
6
7
8
9
10
11
12
13
14
15
16
17
18
19
20
21
22
23
| package com.util;
import org.springframework.context.ApplicationContext;
import org.springframework.context.support.ClassPathXmlApplicationContext;
final public class ApplicationContextUtil {
private static ApplicationContext ac= null;
private ApplicationContextUtil(){}
static{
ac = new ClassPathXmlApplicationContext("applicationContext.xml");
}
public static ApplicationContext getApplicationContext(){
return ac;
}
}
|
model层范围很大,包括(业务层+dao层+持久层),在一个项目中不一定三层全部都有,可以根据实际情况选择,hibernate是持久层,主要解决了关系模型和对象模型之间的阻抗,是一个orm框架。
IOP编程
IOP变成就是面向接口编程,是spring里面比较提倡的一种做法,通过IOC和DI还可以解决层与层之间的解耦,下面使用一个例子说明IOP的好处:
创建一个改变字母大小写的接口
1
2
3
4
5
6
7
8
| package com.ganmy.inter;
public interface ChangeLetter {
public String change();
}
|
两个实现ChangeLetter的类
1
2
3
4
5
6
7
8
9
10
11
12
13
14
15
16
17
18
| package com.ganmy.inter;
public class LowwerLetter implements ChangeLetter {
public String str;
public String getStr() {
return str;
}
public void setStr(String str) {
this.str = str;
}
public String change() {
return str.toLowerCase();
}
}
|
1
2
3
4
5
6
7
8
9
10
11
12
13
14
15
16
17
18
| package com.ganmy.inter;
public class UpperLetter implements ChangeLetter {
private String str;
public String getStr() {
return str;
}
public void setStr(String str) {
this.str = str;
}
public String change() {
return str.toUpperCase();
}
}
|
配置文件beans.xml
1
2
3
4
5
6
7
8
9
10
11
12
13
| <?xml version="1.0" encoding="UTF-8"?>
<beans xmlns="http://www.springframework.org/schema/beans"
xmlns:xsi="http://www.w3.org/2001/XMLSchema-instance"
xmlns:context="http://www.springframework.org/schema/context"
xmlns:tx="http://www.springframework.org/schema/tx"
xsi:schemaLocation="http://www.springframework.org/schema/beans http://www.springframework.org/schema/beans/spring-beans-2.5.xsd
http://www.springframework.org/schema/context http://www.springframework.org/schema/context/spring-context-2.5.xsd
http://www.springframework.org/schema/tx http://www.springframework.org/schema/tx/spring-tx-2.5.xsd">
<bean id="changeLetter" class="com.ganmy.inter.LowwerLetter">
<property name="str" value="Hello" />
</bean>
</beans>
|
调用:
1
2
3
4
5
6
7
8
9
10
11
12
13
14
| package com.ganmy.inter;
import org.springframework.context.ApplicationContext;
import com.util.ApplicationContextUtil;
public class App1 {
public static void main(String[] args) {
ApplicationContext ac = ApplicationContextUtil.getApplicationContext();
ChangeLetter changeLetter = (ChangeLetter) ac.getBean("changeLetter");
System.out.println(changeLetter.change());
}
}
|
IOP相对OOP有一个好处,由于在调用里面对象的指向始终都是ChangeLetter,我们可以想要这个方法大写只需要改动beans.xml里面changeLetter的class的指向,无需改动代码,这样当代码上了生产环境我们也可以改动业务逻辑了,大大的减少了web层和业务层之间的耦合度。
scope属性
在配置文件
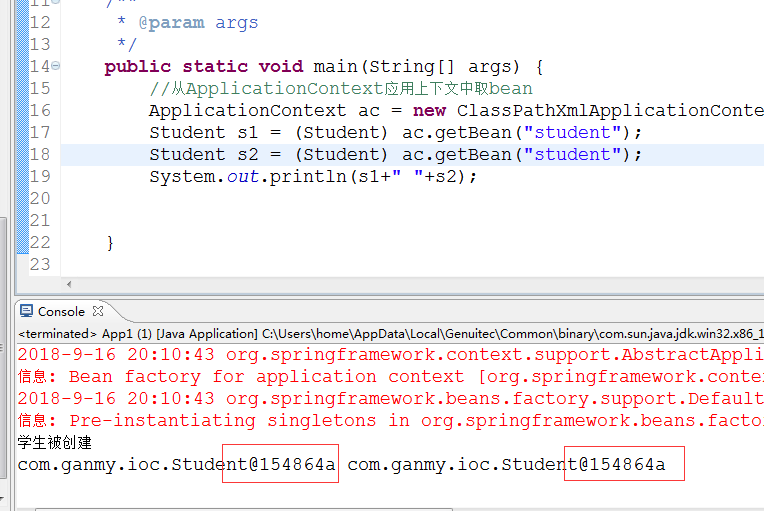
当scope的值为singleton的时候,是单例模式,只会调用一次,可以验证

如图所示,构造方法只调用一次并且s1和s2的地址是相同的
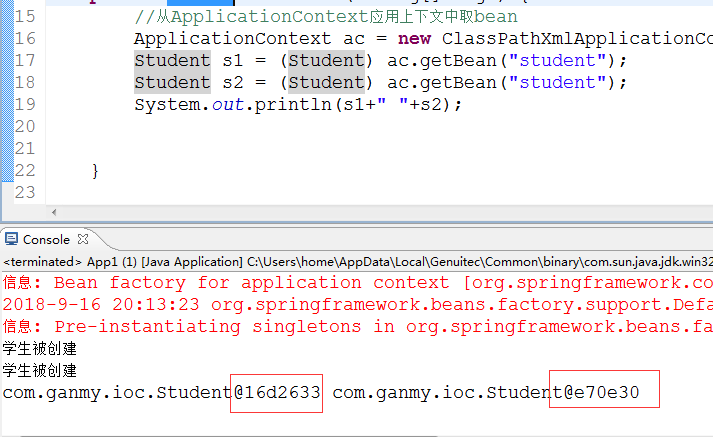
接下来我将scope改为prototype

我们会发现构造方法被调用了两次而且对象的地址不同,说明创建了两个对象,然后我将getbean()去掉,发现没有调用构造方法,所以scope的值为prototype的时候也是类似懒加载的模式
bean的值还有可能是request,session以及global session,这些在web开发的时候才用得着,分别表示生命周期为request、session已经整个spring的周期,global session创建的实例只要spring不关闭就一直存在。
另外当scope的值为prototype的时候,对内存的消耗比较大,要避免使用prototype,尽量使用singleton
通过构造函数注入属性值
之前在beans.xml里面配置property是通过set和get方法注入的,在spring里面也可以通过构造函数注入,例如我要注入一个Employee对象,使用构造函数注入:
1
2
3
4
5
6
7
8
9
10
11
12
13
14
15
16
17
18
19
20
21
22
23
24
25
26
27
28
29
30
31
32
| package com.ganmy.constructor;
public class Employee {
private String name;
private int age;
public Employee(){};
public Employee(String name, int age) {
System.out.println("public Employee(String name, int age)这个构造函数被调用");
this.name = name;
this.age = age;
}
public Employee(String name) {
System.out.println("public Employee(String name)这个构造函数被调用");
this.name = name;
}
public String getName() {
return name;
}
public void setName(String name) {
this.name = name;
}
public int getAge() {
return age;
}
public void setAge(int age) {
this.age = age;
}
}
|
配置文件
1
2
3
4
5
6
7
8
9
10
11
12
13
14
| <?xml version="1.0" encoding="UTF-8"?>
<beans xmlns="http://www.springframework.org/schema/beans"
xmlns:xsi="http://www.w3.org/2001/XMLSchema-instance"
xmlns:context="http://www.springframework.org/schema/context"
xmlns:tx="http://www.springframework.org/schema/tx"
xsi:schemaLocation="http://www.springframework.org/schema/beans http://www.springframework.org/schema/beans/spring-beans-2.5.xsd
http://www.springframework.org/schema/context http://www.springframework.org/schema/context/spring-context-2.5.xsd
http://www.springframework.org/schema/tx http://www.springframework.org/schema/tx/spring-tx-2.5.xsd">
<bean id="employee" class="com.ganmy.constructor.Employee">
<constructor-arg index="0" type="java.lang.String" value="大明"/>
</bean>
</beans>
|
获取还是和之前一样获取,另外要注意两点:
1、默认的构造方法要配置
2、spring会自动匹配对应的constructor-arg类型的构造方法,例如上面会调用Employee(String name)的构造方法,如果我按下面所示配置:
1
2
3
4
| <bean id="employee" class="com.ganmy.constructor.Employee">
<constructor-arg index="0" type="java.lang.String" value="大明"/>
<constructor-arg index="1" type="int" value="23"/>
</bean>
|
则会调用Employee(String name, int age)的构造方法。
set注入和构造函数注入的对比:
使用set注入,我们可以只注入某个属性,对程序的限制更加宽松,如果使用构造函数注入要根据构造函数的规定来严格参数的选择,假如我只提供一个两个参数的构造函数,那么必须根据这两个参数的顺序类型来注入参数,不然就会报错,一般还是set用得更多。
自动装配
例如:
1
2
3
4
5
6
7
8
9
10
11
12
13
14
15
16
17
18
19
20
| package com.ganmy.autowire;
public class Master {
private String name;
private Dog dog;
public String getName() {
return name;
}
public void setName(String name) {
this.name = name;
}
public Dog getDog() {
return dog;
}
public void setDog(Dog dog) {
this.dog = dog;
}
}
|
1
2
3
4
5
6
7
8
9
10
11
12
13
14
15
16
17
18
19
20
| package com.ganmy.autowire;
public class Dog {
private String name;
private int age;
public String getName() {
return name;
}
public void setName(String name) {
this.name = name;
}
public int getAge() {
return age;
}
public void setAge(int age) {
this.age = age;
}
}
|
1
2
3
4
5
6
7
8
9
10
11
12
13
14
15
16
17
18
19
| <?xml version="1.0" encoding="UTF-8"?>
<beans xmlns="http://www.springframework.org/schema/beans"
xmlns:xsi="http://www.w3.org/2001/XMLSchema-instance"
xmlns:context="http://www.springframework.org/schema/context"
xmlns:tx="http://www.springframework.org/schema/tx"
xsi:schemaLocation="http://www.springframework.org/schema/beans http://www.springframework.org/schema/beans/spring-beans-2.5.xsd
http://www.springframework.org/schema/context http://www.springframework.org/schema/context/spring-context-2.5.xsd
http://www.springframework.org/schema/tx http://www.springframework.org/schema/tx/spring-tx-2.5.xsd">
<bean id="master" class="com.ganmy.autowire.Master" autowire="byName">
<property name="name" value="明阳"/>
</bean>
<bean id="dog" class="com.ganmy.autowire.Dog">
<property name="name" value="大黄"/>
<property name="age" value="5"/>
</bean>
</beans>
|
解释:
1、当程序加载到ClassPathXmlApplicationContext()的时候,去加载配置文件,在内存里面创建对象,创建master对象的时候,由于name属性我们已经注入,但是dog属性并没有注入,这个时候dog指向null,由于我们设置自动装箱为byName,会根据dog属性去配置文件里面去找id为dog的bean注入到我们的master里面,由于是根据id去找的,不会出现重复的情况。
2、autowire的值还可以设置为byType,byType就是根据类型去找,如果在beans.xml里面匹配到多个对象则会抛出异常,另外byType是去创建对象还是通过对象的默认构造方法创建的,如果没有默认构造方法就会报错
3、autowire的值为constructor,是根据构造方法去找的,程序在加载到autowire=”constructor”的时候会创建master对象,然后加载到dog属性的时候发现dog属性没有注入,于是试图通过有dog对象的构造函数来创建dog
4、autowire的值为autodetect,表示自动匹配创建方法,优先通过bytype的方式创建,如果不符合bytype再通过constructor的方式创建
5、autowire的值为default,如果不指定autowire属性那么autowire的值就默认是default,当autowire=”default”的时候,具体的类型是根据上面的配置指定的,例如:
1
2
3
4
5
6
7
8
9
10
11
12
13
14
15
16
17
18
19
| <?xml version="1.0" encoding="UTF-8"?>
<beans xmlns="http://www.springframework.org/schema/beans"
xmlns:xsi="http://www.w3.org/2001/XMLSchema-instance"
xmlns:context="http://www.springframework.org/schema/context"
xmlns:tx="http://www.springframework.org/schema/tx"
xsi:schemaLocation="http://www.springframework.org/schema/beans http://www.springframework.org/schema/beans/spring-beans-2.5.xsd
http://www.springframework.org/schema/context http://www.springframework.org/schema/context/spring-context-2.5.xsd
http://www.springframework.org/schema/tx http://www.springframework.org/schema/tx/spring-tx-2.5.xsd" default-autowire="byName">
<bean id="master" class="com.ganmy.autowire.Master" autowire="default">
<property name="name" value="明阳"/>
</bean>
<bean id="dog" class="com.ganmy.autowire.Dog">
<property name="name" value="大黄"/>
<property name="age" value="5"/>
</bean>
</beans>
|
由于default-autowire为byName,那么autowire也为byName,然后default-autowire的默认值为no,所以当autowire和default-autowire都没写的时候,default-autowire的值为no,autowire的值为default,然后autowire根据default-autowire的值传递变为no
一般自动装配很少使用,大部分情况用set就行了
分派器
引入文件,然后可以读取文件的信息,例如我们要配置JDBC,可以将jdbc的信息写到一个配置文件里面,然后在代码里面去读取
创建两个.properties文件
db.properties
1
2
3
4
| name=root
dirver=com.mysql.jdbc.Driver
url=jdbc:mysql://localhost:3306/users
pwd=root
|
db1.properties
1
2
3
4
| name1=root1
dirver1=com.mysql.jdbc.Driver1
url1=jdbc:mysql://localhost:3306/users1
pwd1=root1
|
DBUtile.java
1
2
3
4
5
6
7
8
9
10
11
12
13
14
15
16
17
18
19
20
21
22
23
24
25
26
27
28
29
30
31
32
33
34
35
| package com.ganmy.dispatch;
public class DBUtil {
private String dirver;
private String url;
private String name;
private String pwd;
public String getDirver() {
return dirver;
}
public void setDirver(String dirver) {
this.dirver = dirver;
}
public String getUrl() {
return url;
}
public void setUrl(String url) {
this.url = url;
}
public String getName() {
return name;
}
public void setName(String name) {
this.name = name;
}
public String getPwd() {
return pwd;
}
public void setPwd(String pwd) {
this.pwd = pwd;
}
}
|
beans.xml文件
1
2
3
4
5
6
7
8
9
10
11
12
13
14
15
16
17
18
19
20
21
22
23
24
25
| <?xml version="1.0" encoding="UTF-8"?>
<beans xmlns="http://www.springframework.org/schema/beans"
xmlns:xsi="http://www.w3.org/2001/XMLSchema-instance"
xmlns:context="http://www.springframework.org/schema/context"
xmlns:tx="http://www.springframework.org/schema/tx"
xsi:schemaLocation="http://www.springframework.org/schema/beans http://www.springframework.org/schema/beans/spring-beans-2.5.xsd
http://www.springframework.org/schema/context http://www.springframework.org/schema/context/spring-context-2.5.xsd
http://www.springframework.org/schema/tx http://www.springframework.org/schema/tx/spring-tx-2.5.xsd">
<context:property-placeholder location="com/ganmy/dispatch/db.properties,com/ganmy/dispatch/db1.properties"/>
<bean id="dbutil" class="com.ganmy.dispatch.DBUtil">
<property name="name" value="${name}"/>
<property name="dirver" value="${dirver}"/>
<property name="url" value="${url}"/>
<property name="pwd" value="${pwd}"/>
</bean>
<bean id="dbutil1" class="com.ganmy.dispatch.DBUtil">
<property name="name" value="${name1}"/>
<property name="dirver" value="${dirver1}"/>
<property name="url" value="${url1}"/>
<property name="pwd" value="${pwd1}"/>
</bean>
</beans>
|
我们调用的时候可以选择DBUtil1对象或者DBUtil1对象有选择的调用配置文件的信息

